Mudroom makeover Project

Pinterest is evil. I see all these pictures of beautiful mudrooms or front entryways, of course that gets me thinking. So it all began with buying a new set of washer & drier that were front load. Let the fun begin. First was the washer & drier stand. Stacking them was just too easy, we need a stand,

IMG_3019

Beside the washer and drier stand my wife wanted some sort of pantry for laundry “stuff”, so came the shelf/panry next to it. Those two were put in first,

IMG_3032

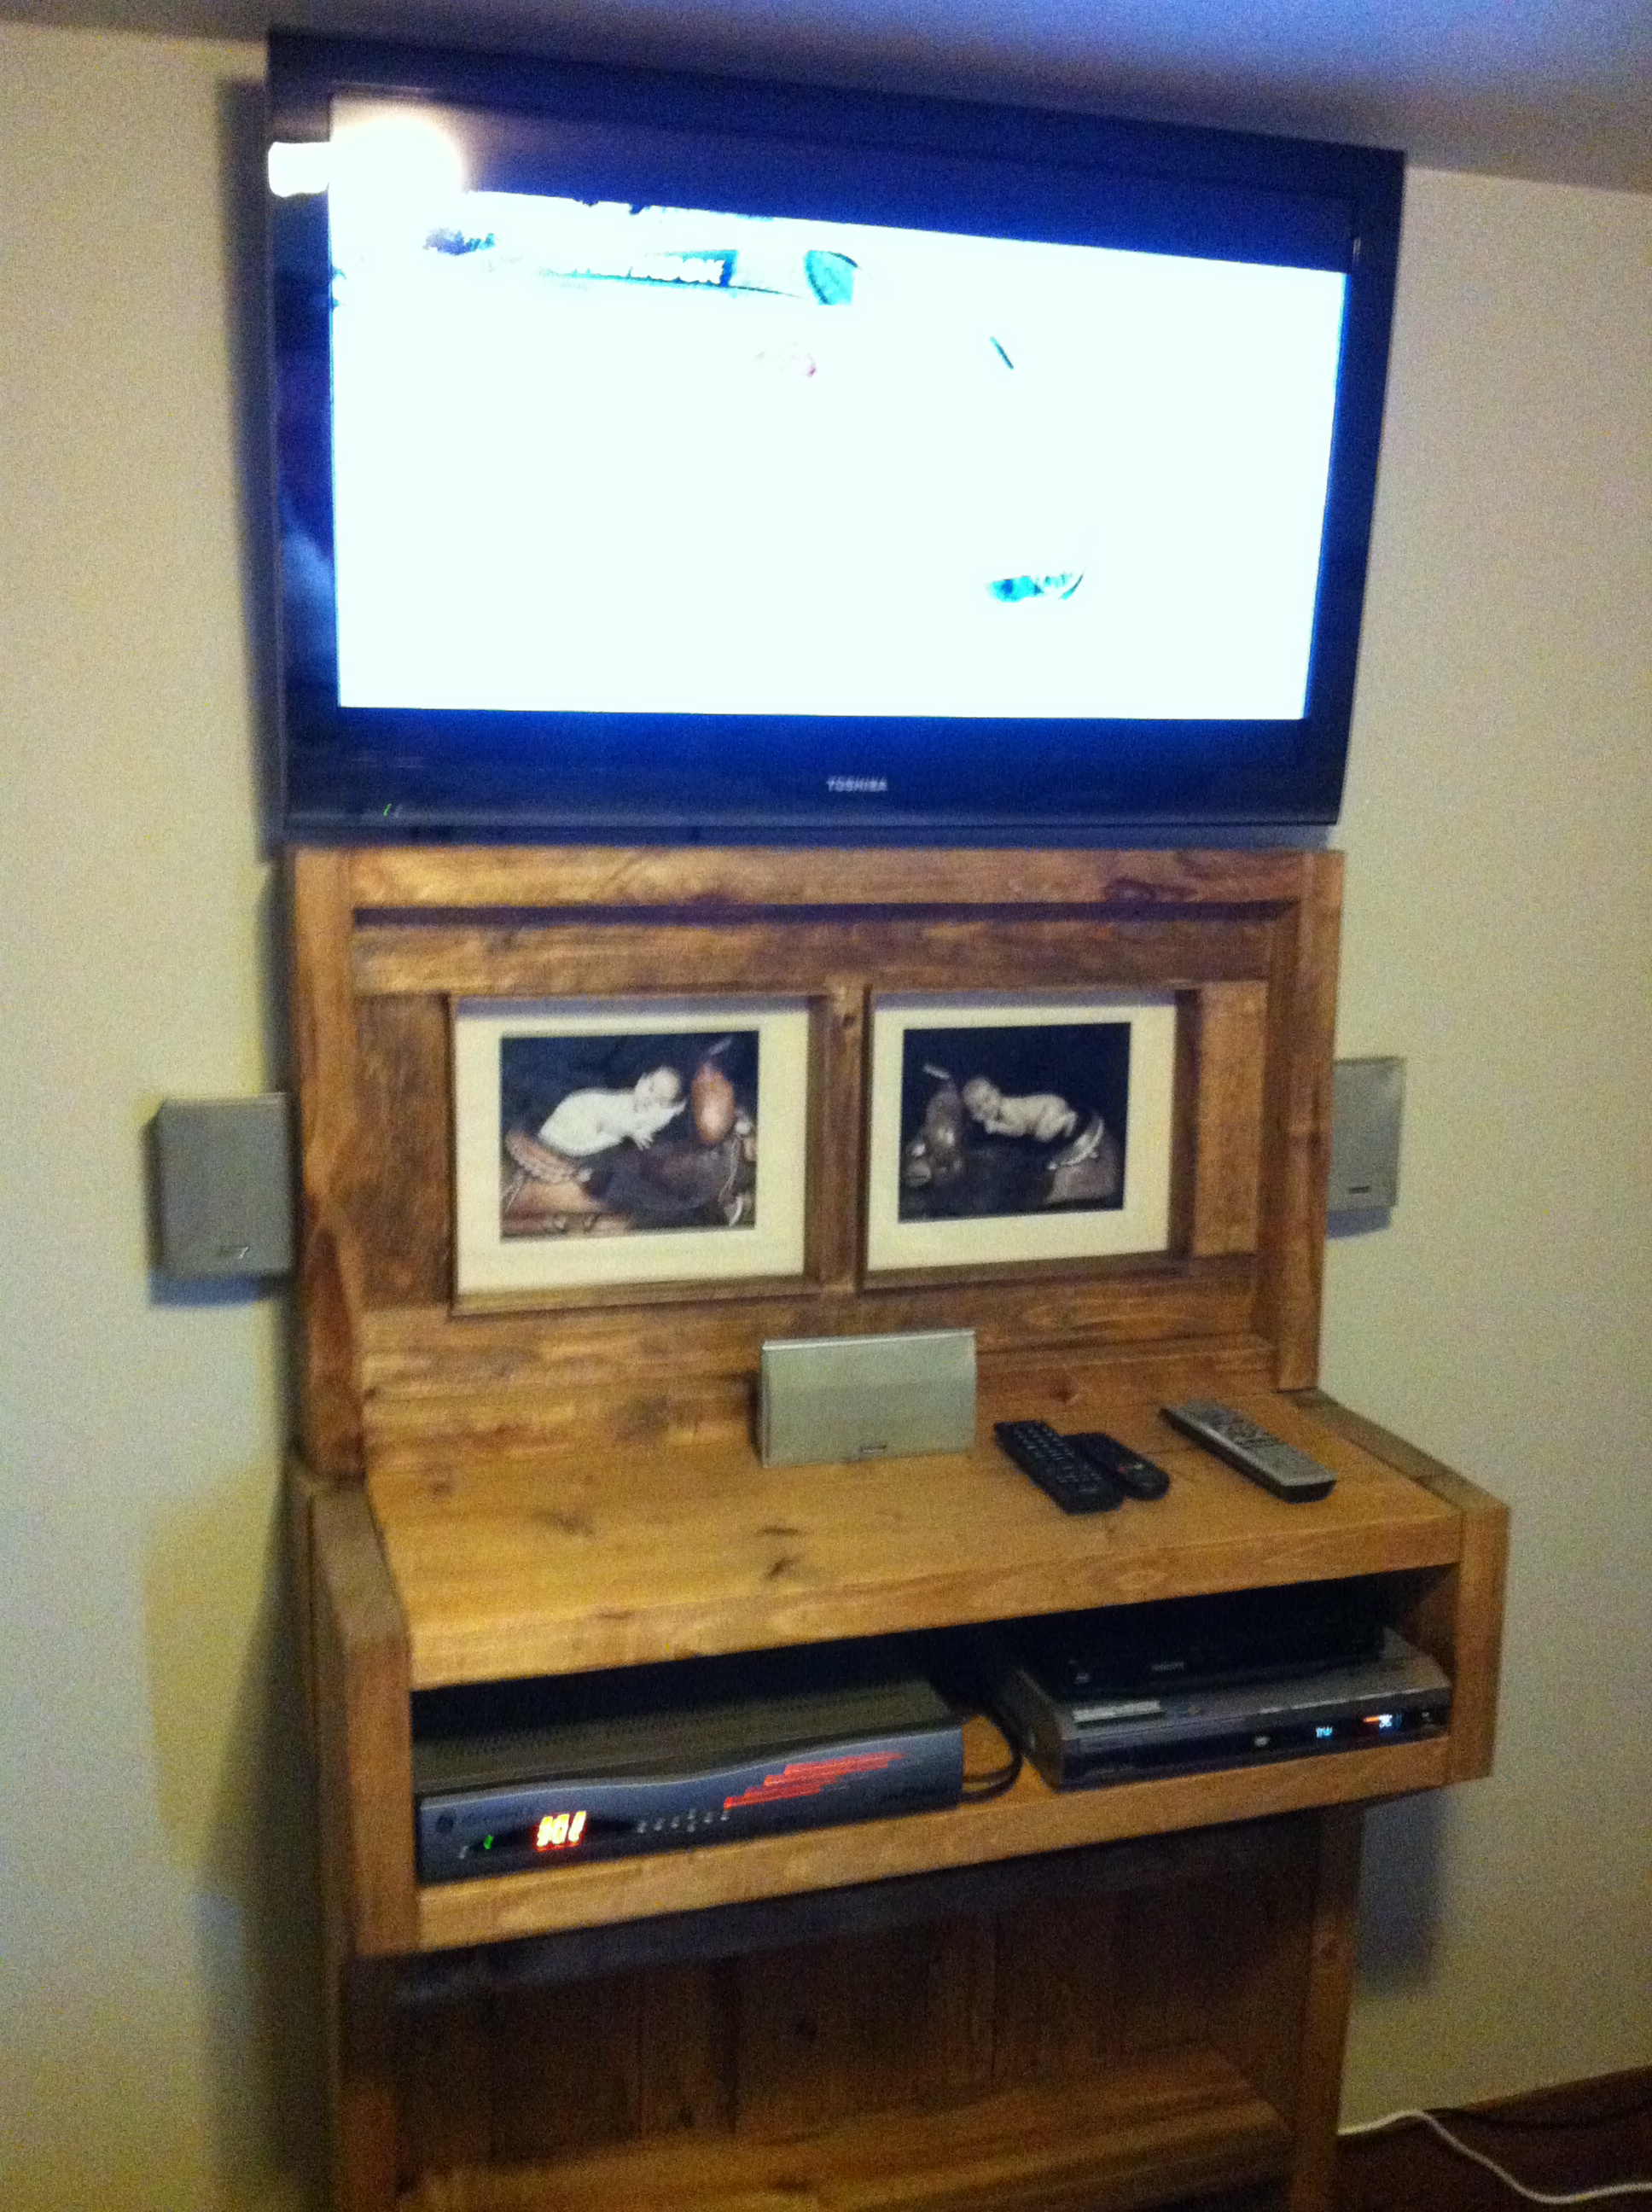
Next came what I wanted, a farm sink for cleaning up when you come in from working outside. I decided to go with a bar sink to save on space since the countertop wasn’t going to be too big. Plus I thought a bar sink was much more practical for hand washing and such rather than a full size kitchen sink or utility sink. The counter top was made out of the 2×8 oak piece’s I got from the rig mat place. The counter top was cut to fit exactly between the wall and the washer & drier stand to provide that floating counter top look and give lots of space underneath for water jugs and flats of pop & such. The backsplash was then added partly to cover the rest of the washer connections and also give a back to the countertop.

IMG_3099

IMG_3098

Next was adding some shelving above the counter top. Another pintrest idea was used for this with the shelving brackets. And I have to say, much cheaper and better looking this way!

IMG_3157

IMG_3156

Next it was over to the other side of the mudroom for coat, boot and accessory storage. Again, I’d seen a very nice design on pinterest that incorporated a bench with boot storage under and closet at the back of. Then divided into 4 sections. I decided to pretty much copy that design making only a few modifications, one being for accessories since we’re in Northern Alberta and need toque, mitt and glove storage in the winter. Along with horseshoe hooks to go with the shelving across the way.

DSCF0113

DSCF0114

Finally, both pieces in and filled up,

DSCF0121 - edited

DSCF0123 - edited

I’m happy with how it turned out. I might add some paneling beside the closet just so it’s not wood and then painted drywall. Plus add some more hooks for coveralls and such.

The Second End Table Project

Wow, almost a year later and finally getting around to the second end table to complete the set. Kind of got sidetracked with toy boxes. But I had a piece of the shelving left over from the picture project that was just the right size for the top so this one I decided to just start from there and wing it.

IMG_2920

First attaching the side pieces.

IMG_2949

Then attaching the legs. Different style this time, going with 2×2 legs & a bottom support shelf instead of the massive 4×4’s and no shelf like last time.

IMG_2950

Gluing together the bottom shelf. This was made out of 2″ rough oak that I picked up as scrap wood from a rig mat manufacturing plant. I figured the weight of the oak would help make the table more bottom heavy. Plus a good first try to test it out before a bigger project I’ve got planned with it.

IMG_2954

Screwing it in place and adding a piece of poplar over the cut ends.

IMG_2968

Finished with Danish oil and clear coated.

IMG_2991 - edited

All finished & dry.

IMG_2993 - edited

And finally after more than a year, a completed set of coffee table & two end tables. Plus with the entertainment centre, bookshelf & toy box, I have replaced everything in my living room with stuff I’ve built including two pictures hanging on the wall. Now to move onto the other rooms 😉

3 Part Picture Project

I stopped into Boyd’s department store in Fairview just before Christmas looking for some decorations and came across a picture. It was a picture broken up into 3 canvases. I’ve always liked those. This was different though in that it was framed in wood. With a main frame around the outside and 2 dividers giving in 3 spaces. In those 3 spaces were canvas’s. It looked amazing, I thought that would be a good project. After looking at the cost of getting canvas’s printed I started doing so research and found mounting pictures on wood using this modge podge. After all it was just the raised affect that made the picture stand out. So after debating between a couple pictures, I decided on a picture to use.

Photo layout

This was the first challenge to figure out photoshop enough to be able to do that. But some online youtube video’s helped with that. I got the pictures printed (11×14) and picked up some modge podge to attach them to the frame. Next was building the frame. I got a piece of pine shelving 16″x8′ and set out.

IMG_2888

First attaching the top and bottom piece of the frame to the backing.

IMG_2889

Then inserting the dividers making sure to have 3 exactly equal spaces of 13×16 (1 inch space around)

IMG_2890

Then using spacers of wood to place the picture backings into the 3 spaces.

IMG_2892

All put in.

IMG_2896

Finally the end pieces of the frame put on.

IMG_2898

Finished with Danish oil.

IMG_2919

Making sure the photos fit and then applying the modge podge to the wood backing and placing the photos on. I did have to do a lot of smoothing to get all the bubbles out with paper towels and being very careful to clean up the excess without getting too much on the photos.

IMG_2938 - edited

But finally I had this. Attached hooks on the inside of frame ends at the back and picture wire between them. A couple heavy duty picture hooks for the wall and hung it.

Toy Box #2 Project

Well this one took a while but it’s finally finished. Same design as toy box #1 and first time I’ve done a second printing I guess (my mom’s an artist so the lingo comes with). So again, began with the sides and the front.

IMG_1453

View of the inside with the legs sitting inside waiting to be cut.

IMG_1454

The back on, looking inside.

IMG_1456

Next, the legs and side pieces added.

IMG_1478

For this one I tried to leave a bit of the rough from the rough cut lumber when I planned the legs. So the saw marks would come through as darker patches. I also used a piece for the bottom rail that was a bark edge piece of lumber. Peeling the bark and sanding it down.

IMG_1479

Side view.

IMG_1481

Top view.

And this is how it sat for quite a while as I just had no extra time to work on it. But eventually I found some time and started work on the lid.

IMG_1827 - edited

The lid complete and added with the gas struts as stays.

100_3779

Finally finished with Danish oil again and dried. It was dark and rainy outside, so it was dark in the shop and some of the pictures didn’t turn out quite as well. Hopefully I can get some better ones before it goes to it’s new home.

100_3782

Close-up of the legs with the saw mill marks left on, after being stained.

100_3783

View of the front with the bark edge piece as the bottom rail.

100_3784

The poplar top rail with some runs and knots in it. The top back and front rails, the toy box floor and the lid edging are all made of poplar. The rest is spruce.

100_3788

A good side view.

100_3789

Other side.

100_3790

Lid open.

100_3791

View of the inside.


Toy Box #1 Project

We decided for this next project, we were going to build something to sell. My wife suggested a toy box because she knows a few people looking for them. So I went to work on a design and came up with this,

20130213-201915.jpg

So work began. First off gluing the front together.

20130213-202105.jpg

Adding the top rail. Made out of poplar.

20130213-202322.jpg

Gluing together one of the side pieces.

20130213-202447.jpg

Gluing the bottom together.

20130213-202528.jpg

All the pieces ready for assembly.

20130213-202612.jpg

The bottom and two sides assembled.

20130213-202830.jpg

The front added.

20130213-202732.jpg

Back added and one leg on.

20130213-203119.jpg

All the legs on.

20130213-203231.jpg

Trim added.

20130213-203313.jpg

20130213-203337.jpg

20130213-203404.jpg

Gluing the lid together.

20130213-203529.jpg

Lid attached, ready for finishing.

20130213-203617.jpg

Finished and gas shocks added.

20130213-203740.jpg

20130213-203810.jpg

20130213-203845.jpg

20130213-203925.jpg

20130213-203956.jpg

20130213-204027.jpg

20130213-204145.jpg

A few larger and better quality photos

100_3677_edited-1

100_3682

100_3680

The Barn Bunkbed Project

While I’m working on the next project I thought I’d go back a bit and post an older project.  This was the first project I used SketchUp for and the last project I made out of commercial lumber.  Our first child was growing out of his crib and it was time for his first bed.  We wanted something farm related.  I can’t really remember how it came about but we both thought a classic red barn as a bed would be really cool.  After a few hand drawings and narrowing it down to something within my skill level, we settled on a sort of design.  I then put it on SketchUp.

Bryce's bed both views

I wanted the idea of he gets to sleep in the loft of the barn.  We had grand plans originally of covering the front like a real barn and making a real working barn door.  But then I realized we’d need lighting inside or else it would just be a dark area.  So that was going a little far.  We opened it up.  His room is quite small so we conserved space by making the stairs run up along the wall, making the entire front of the bed that’s out into the room open.  We originally were thinking drawers in the stairs like other bunk beds, but again scrapped those idea’s for something simpler.  Instead going with just a whole bunch of little nooks for small toys.  My wife also wanted a deck off the front and he would access his bed through the front upstairs window of the barn that we would make open and close but we also scrapped that idea for the simplicity of an opening in the roof at the top of the stairs that he could walk through.

So with the design in place, I started working on it.  First the barn ends.

IMG_0299

I started by attaching all the 2×4’s together with the bottom and middle piece.  You can see this better in a later picture (right now it’s underneath)

IMG_0301

I then cut the barn style out of both of the ends with a skill saw.

IMG_0300

Here you can see one of the ends completed.  The bottom 2×4 runs the entire width and the middle one is at the height of the bed and runs the width, minus 1.5″ at either side to allow the bed frame to attach to that 2×4, making it flush with the outside of the barn ends.

IMG_0325

Then both ends were moving up to his room and the bed frame built between them.  I made the bed frame out of 2×6’s.  Two running between the ends and then a number of them running between those two to hold the mattress.  There is also a 2×4 running between the two ends you can just see in the bottom of the photo.  This will be the beginning of the stairs.

IMG_0332

My wife had me add a railing along the inside of the bed frame out of 2×4’s but that’s optional.  Then I started on the roof top pieces (the short pieces around the door I added later).  Simply 1×6’s running between the two barn ends and I had it overhang an inch on either side.  More would look more authentic but then you also run the risk of making something to run your head into later.  Then I moved onto the stairs.

IMG_0341

IMG_0343

Fairly self explanatory from the pictures I guess.  Framing the bottom with 2×4’s attached to the two barn ends.  Forming a box to start building up from.  I made my stairs 16.5 inches wide (the width of 3 2×6’s).  Then used 90 degree angle braces to attach the cross pieces.

IMG_0344

Next was the back part of the roof.  For this I needed a metal brace to support the roof where it would end at the door.  So I put in a metal strip that I could attach the other ends of the roof pieces.  With holes drilled for screws to hold the roof to the metal brace.  Then it was attached to the bed frame and one of the top roof pieces.  Bent to match angles of course.  Then added the rest of the roof pieces.

IMG_0346

IMG_0345

Next I added the decorative barn trim to the front and painted the entire thing in red, white and black.

IMG_0380

Finally I added the guard rail.  This I painted seperately and added to the bed with 4 hinges along it’s length attached to the bed frame.  With 2 hooks at either end to hold it closed.

IMG_0383

IMG_0376

And that’s about it.  Looking back, I probably would have made that guard rail removable because it does make it hard to change the sheets when it’s down.  It just get’s in the way and you can’t reach to the back corners.  So we have to climb into his bed to put on new sheets.  Other then that it works perfectly and he loves going upstairs into his bed.

IMG_0388

The tester dog.

IMG_0391

IMG_0395

The First End Table Project

With the addition of the new coffee table, now all our end table’s look out of place.  So little project this time to build some matching end tables.

IMG_1090

Fairly simply design.  16 inch square table top, 1 inch by 3 inch boarder around it and 4 4×4 legs.  So here’s the top cut and glued together.

IMG_1091

Branded of course to match the coffee table top.

IMG_1094

Legs added.

IMG_1098

And finally, finished.  Now just to see how it fits in and what other sizes work.

IMG_1121

IMG_1122

IMG_1123

The Bedroom TV Shelf Project

For Christmas this year we decided to get ourselves a new TV for the bedroom. We decided it would be mounted on the wall at the foot of the bed. But what are we going to do with the “accessories”? The DVD player and the satelite reciever. Both older machines, so not like these slim new ones. We couldn’t decide on a place out of the way, so they’d have to go just below the TV on a shelf of some sort. After a quick trip to the hardware store to look at shelves that would hold these large machines on the wall and finding nothing really appealing, whatelse, let’s build something. So back to the drawing board I went and came up with this,

IMG_1056

It would come right to the bottom of the TV hanging on the wall and out away from the wall just as far. We debated a frame to go around the TV but being as the control panel was on the side of the TV, we thought this would just be a nuisance. Biggest thing is it would have a 1″ gap in the back in places for cords. The edges would sit flush with the wall though. The picture frame was added as a way to get the shelf far below the TV without just having dead space. Plus, we could use the space behind it for cords.

IMG_1058

I started with the base. Just simply a 2×6 on either side, 2 shelves same thing and then a sloping out to accomidate the electronics shelf. In the middle of the backing was an offset back piece that allowed a 1 inch slot behind for cords. The electronics shelf would be held on by 90 degree brackets on the front and the 1×6 backing that came up 2 inches in the back to attach to the bottom of the electronics shelf.

IMG_1059

IMG_1060

Next came the picture frame and that was a challenge. But after a few miss cut pieces and a lot of fine cutting it was done. It was attached with wood pieces behind and one screw in the front.

IMG_1068

I then stained it again with Danish oil, added the glass and photos to the picture frames and moved it up to the bedroom. This is what it looked like after it was all setup under the TV.

IMG_1073 - edited

IMG_1074

IMG_1076

IMG_1077

The Train Table / Coffee Table Project

We were deciding what to get our son for Christmas this year. He loves trains and had a small wooden set he got last year. We set it up for him on our little coffee table sometimes but it just barely fits and usually falls off. So my wife suggested another train set with a train table. But where do we put it, our house is filled as it is. Maybe we should just replace the coffee table that we’re using now.

Quick search showed a few tables that were fairly bland. One do it yourself one with a removable top looked alright but still missed a bit of western. So it was decided to go to the drawing board again for a train table / coffee table. We wanted a couple drawers to store toys and of course his new wooden train set. Plus a completely removable top that would change a coffee table to a train table. We also decided to have the train table top able to be flipped over so we could have two different options of the play top. Again I used Google Sketchup and came up with this design.

20121219-215341.jpg

I’ve gotten into Pinterest since the entertainment unit and found some design and function ideas there for this. I kind of liked the overall chest style from a few coffee table pins on pinterest, hence the larger flat bottom and larger top. Plus some other ideas I wanted to try.

So I started out constructing each end of the table.

20121219-220120.jpg

20121219-220153.jpg

Then connecting the two.

20121219-220336.jpg

Adding the top railing.

20121219-220423.jpg

Ensuring the train table top will fit before giving to my wife to paint a play scene on.

20121219-220634.jpg

The top just sits freely in there, resting on the 2×4 corners. Once the siding is on, it will also rest on that.

Then I added the solid bottom.

20121219-220854.jpg

I then added the siding.

20121219-221101.jpg

20121219-221138.jpg

Then it was time to move onto what will be the removable coffee table top. With 2 2×6’s crossways under, they hold the top together and also hold it in place on the table. It is also glued together though.

20121219-221439.jpg

20121219-221513.jpg

Then it came time for some experimenting with some ideas on Pinterest. Namely inlaying horseshoes into wood.

20121219-221938.jpg

Seemed to have worked, so time to cut into my new table top.

20121219-222108.jpg

And repeat.

20121219-222144.jpg

Time to get out the branding irons.

20121219-222409.jpg

Build a couple drawers and brand them as well.

20121219-222535.jpg

Sand, glue in the horseshoes and stain with Danish oil. The coffee table top was also finished with a clear coat.

20121219-222806.jpg

Now for another idea from Pinterest, horseshoe handles. Two out of regular horseshoes for the ends and four out of eggbar horseshoes for the drawer handles.

20121219-223131.jpg

20121219-223211.jpg

20121219-223249.jpg

I think the brands show up really well, branded, sanded, stained and clear coated.

20121219-223659.jpg

I don’t think I did too bad trying to recreate the inlaid horseshoe. Without a router, I jigsawed the whole depth. Only thing with that was I couldn’t cross a joint without the risk of breaking it. So I played it safe and stayed on the whole board. Here’s Pinterest’s and then mine.

20121219-224235.jpg

20121219-224307.jpg

So now time to move it into the house and put the now painted train table top in it.

20121219-224536.jpg

20121219-224624.jpg

20121219-224702.jpg

Joining the now matching entertainment centre.

20121219-224740.jpg

20121219-225417.jpg

20130109-142316.jpg

The Entertainment Centre Project

Our first project. We decided we wanted a TV stand that would accommodate a toy chest somehow and some storage for larger kid toys like ride on cars and hot wheels towers. Plus the standard DVD storage and such. We wanted something tall as well, so the TV would be up high away from dirty fingers and flying toys.

After searching a few furniture stores and a few online searches with nothing we liked, we decided to design exactly what we wanted.

I used a program called Sketchup. It’s freely available for download and use from Google. I did some drawing and my wife would give me ideas. Basing our design off using rough lumber of true dimensions (2×6, 2×8, etc). We finally settled on the following design.

20121219-191225.jpg

TV Stand diminsions

The main unit would have DVD shelves on the left, a large cabinet, a shelf for TV related electronics and a shroud around the TV on top. 90 degrees to it would be a book shelf toy box combination that would fit into the main unit but be a separate piece. The empty space in the corner would become part of the main units cabinet space.

So construction began. I started with the DVD shelf.

20121219-192150.jpg

20121219-192227.jpg

Then I finished off the back of the DVD shelf and finished off the rest of the body of the main unit. Building from the bottom up.

20121219-193158.jpg

20121219-193235.jpg

I then finished off the back of the cabinet. I used 1×6’s because we want to hang our TV on it so it needed strength. The back of the TV electronics shelf was left open for cords.

20121219-194351.jpg

20121219-194422.jpg

Then it was time to move onto the cabinet doors. I originally wanted barn style hinges but couldn’t find any locally that would work with my design so I just used simple slightly hidden ones.

20121219-194732.jpg

20121219-194805.jpg

Then it was time to move onto part two, the toy chest and book shelf. I started by constructing the basic box of the toy box out of 2×6’s.

20121219-195143.jpg

20121219-195218.jpg

Then constructed the bookshelf out of 2×8’s, 2×6’s and a back out of various 1″ boards. It was built to over lap the back of the toy box and the bottom shelf would rest on the back of the toy box. The 1″ boards where then secured to the 2″ stuff to make it one piece.

20121219-195653.jpg

20121219-195730.jpg

The two pieces were never connected together. The top of the main unit sticks out 2 inches, but where the book shelf rises past it, it’s cut to fit the bookshelf flush to the side of the main unit. This prevents it from tipping forward.

Then the toy box lid was added using toy box supports and a long hinge. We also added a way to lock it shut so we can control the toys.

20121219-200528.jpg

20121219-200646.jpg

And of course tested.

20121219-200844.jpg

20121219-200923.jpg

Finally the TV shroud was built to frame the TV.

20121219-201053.jpg

Finally the counter sunk screws were wood filled, all sanded and stained with Danish oil and moved into our home. I’m not sure how much the main unit weighted but it defiantly is not light.

We dismantled our old TV stand and mounted the old bracket to the back of this one so our TV is mounted securely to the stand and can rotate.

20121219-201758.jpg

20121219-201836.jpg

20121219-201919.jpg

20121219-202339.jpg